JeT

**My question**
The same way it's often (always?) a good idea to turn a `table` into a graph, I'd like to be able to simply turn (long) lists into `mindmaps` by wrapping these lists into a `mymindmap` environment.
**Example**
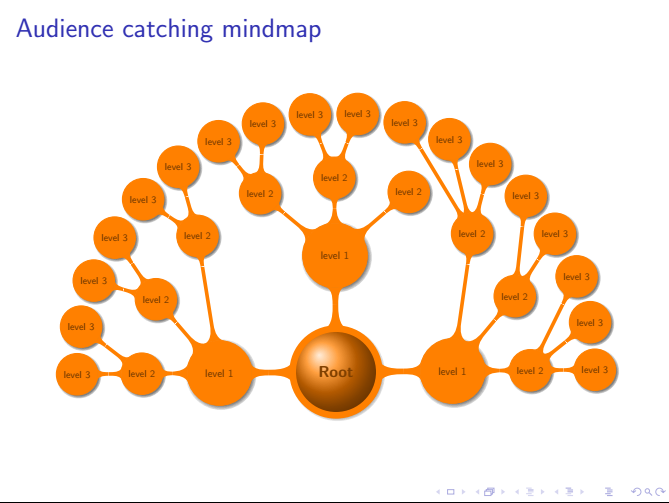
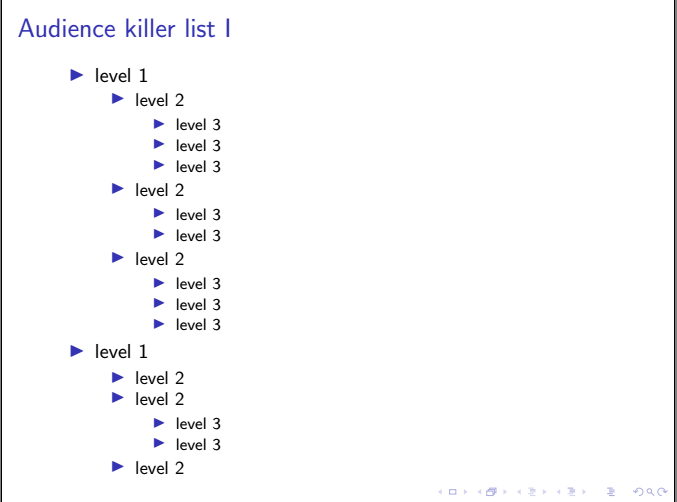
vs same content in this long nested list (I could have splitted into 3 frames, but for the sake of the example, I left it as a long list).
**Context and previous building blocks**
Long `itemize` and `enumerate` are boring, especially on `beamer`.
Mindmaps are great, but I find them difficult to include cause of the nested `{}` that take some time to debug.
1. Thanks to this (canonical IMO) [answer](https://topanswers.xyz/tex?q=1808), the organization of mindmaps is automatically handled and leads to regular growing cycle, easy to parameter with `pgfkeys`.
2. Thanks to [this answer](https://tex.stackexchange.com/questions/542498/mindmap-attributes-grow-cycle-level-1-etc-in-a-mymindmap-style), it's easy to create your own style for the mindmap.
```
%----------------------------------------------
% Style of the mindmap
%----------------------------------------------
\tikzset{mymmstyle/.style 2 args={
text width=1.5cm,
align=flush center,
mindmap,
Julien growth,
mmap/overall rotation=\pgfkeysvalueof{/tikz/mmap/rotation},
mmap/sign = 1,
mmap/name = semicirc, %<- you need unique names if you want to use several mindmaps
every node/.style={
concept,
circular drop shadow,
execute at begin node=\hskip0pt,
text=#2,
},
node font=\sffamily,
nodes={concept},
concept color=#1,
root concept/.append style={
ball color=#1,
line width=1.5ex,
text=#2,
font=\LARGE\bfseries\scshape,
minimum size=3.25cm,
text width=3.25cm
},
level 1/.style={%
level distance=\pgfkeysvalueof{/tikz/mmap/distance to 1},%
font=\large,%
minimum size=2.5cm,%
text width=2.0cm,
fill= #1!70,
sibling angle/.evaluated={\pgfkeysvalueof{/tikz/mmap/shape angle}/max((MMapNodesAtLevel(1)-1),1)}
},
level 2/.style={%
level distance=\pgfkeysvalueof{/tikz/mmap/distance to 2},%
font=\normalsize,%
minimum size=1.5cm,%
text width=1.5cm,
fill= #1!50,
sibling angle/.evaluated={\pgfkeysvalueof{/tikz/mmap/shape angle}/max((MMapNodesAtLevel(2)-1),1)}
},
level 3/.style={%
level distance=\pgfkeysvalueof{/tikz/mmap/distance to 3},
font=\normalsize,
minimum size=1.5cm,
text width=1.5cm,
fill= #1!30,
sibling angle/.evaluated={\pgfkeysvalueof{/tikz/mmap/shape angle}/max((MMapNodesAtLevel(3)-1),1)},
offset angle=\pgfkeysvalueof{/tikz/mmap/offset level 3}
},
level 4/.style={%
level distance=\pgfkeysvalueof{/tikz/mmap/distance to 4},
font=\normalsize,
minimum size=1cm,
text width=1cm,
fill= #1!30,
sibling angle/.evaluated={\pgfkeysvalueof{/tikz/mmap/shape angle}/max((MMapNodesAtLevel(4)-1),1)},
offset angle=\pgfkeysvalueof{/tikz/mmap/offset level 4}
},
}
}
```
**What could this environment look like ?**
To turn lists into mindmaps, I'd like to create a simple `environment` that could (open to any alternative) look like this
```
\begin{mymindmap}[mymmstyle={node color}{text color}]{Root concept}
% easy to comment/uncomment
\begin{itemize}
\item level 1
\begin{itemize}
\item level 2
\begin{itemize}
\item level 3
\item level 3
\item level 3
\end{itemize}
\item level 2
\begin{itemize}
\item level 3
\item level 3
\end{itemize}
\item level 2
\begin{itemize}
\item level 3
\item level 3
\end{itemize}
\end{itemize}
\item Pricing
\begin{itemize}
\item level 2
\begin{itemize}
\item level 3
\item level 3
\end{itemize}
\item level 2
\begin{itemize}
\item level 3
\item level 3
\end{itemize}
\item level 2
\begin{itemize}
\item level 3
\item level 3
\item level 3
\end{itemize}
\end{itemize}
\end{itemize}
\end{mymindmap}
```
**MWE**
```
\documentclass{beamer}
\usepackage{tikz}
\usetikzlibrary{mindmap,shadows}
\definecolor{myuniversity}{RGB}{36, 0, 132}
%--------------------
% GrowCycle
% Till level 5
%--------------------
\makeatletter
\newif\ifmmap@debug
\mmap@debugfalse
\newcommand{\mmap@debug@message}[1]{\ifmmap@debug
\typeout{#1}%
\fi}
\def\tikz@mmap@store@aux#1#2{%
\immediate\write\@mainaux{\string\expandafter\xdef\noexpand\csname pgfk@/tikz/mmap/\pgfkeysvalueof{/tikz/mmap/name}/#1\string\endcsname{#2}}}%
\def\tikz@mmap@get@from@aux#1#2{%
\ifcsname pgfk@/tikz/mmap/\pgfkeysvalueof{/tikz/mmap/name}/#1\endcsname
\edef#2{\csname pgfk@/tikz/mmap/\pgfkeysvalueof{/tikz/mmap/name}/#1\endcsname}%
\else
\edef#2{0}%
\fi
}
\pgfmathdeclarefunction{MMapNodesAtLevel}{1}{%
\tikz@mmap@get@from@aux{n-\@roman{#1}}{\pgfmathresult}}
\newcount\tikzcountchildi
\newcount\tikzcountchildii
\newcount\tikzcountchildiii
\newcount\tikzcountchildiv
\newcount\tikzcountchildv
\newcount\tikzcountchildvi
\tikzcountchildi=0
\tikzcountchildii=0
\tikzcountchildiii=0
\tikzcountchildiv=0
\tikzcountchildv=0
\tikzcountchildvi=0
\tikzset{Julien growth/.style={%
growth function=\tikz@grow@Julien,
mmap/initialize counts,
/tikz/execute at end scope={%
\tikz@mmap@store@aux{n-i}{\the\tikzcountchildi}%
\tikz@mmap@store@aux{n-ii}{\the\tikzcountchildii}%
\tikz@mmap@store@aux{n-iii}{\the\tikzcountchildiii}%
\tikz@mmap@store@aux{n-iv}{\the\tikzcountchildiv}%
\tikz@mmap@store@aux{n-v}{\the\tikzcountchildv}%
\tikz@mmap@store@aux{n-vi}{\the\tikzcountchildvi}%
}},
mmap/.cd,
initialize counts/.code={\global\tikzcountchildi=0%
\global\tikzcountchildii=0%
\global\tikzcountchildiii=0%
\global\tikzcountchildiv=0%
\global\tikzcountchildv=0%
\global\tikzcountchildvi=0%
}
}
\def\tikz@grow@Julien{%
\pgftransformreset%
\pgftransformshift{\pgfpoint{\pgfkeysvalueof{/tikz/mmap/overall xshift}}%
{\pgfkeysvalueof{/tikz/mmap/overall yshift}}}%
\ifcase\tikztreelevel
\or
\pgfmathsetmacro{\pgfutil@tempb}{\pgfkeysvalueof{/tikz/mmap/overall rotation}%
+\pgfkeysvalueof{/tikz/mmap/sign}*\pgfkeysvalueof{/tikz/offset angle}%
+\pgfkeysvalueof{/tikz/mmap/sign}*\pgfkeysvalueof{/tikz/sibling angle}*\tikzcountchildi}%
\global\advance\tikzcountchildi by1\relax%
\or
\pgfmathsetmacro{\pgfutil@tempb}{\pgfkeysvalueof{/tikz/mmap/overall rotation}%
+\pgfkeysvalueof{/tikz/mmap/sign}*\pgfkeysvalueof{/tikz/offset angle}%
+\pgfkeysvalueof{/tikz/mmap/sign}*\pgfkeysvalueof{/tikz/sibling angle}*\tikzcountchildii}%
\global\advance\tikzcountchildii by1\relax%
\or
\pgfmathsetmacro{\pgfutil@tempb}{\pgfkeysvalueof{/tikz/mmap/overall rotation}%
+\pgfkeysvalueof{/tikz/mmap/sign}*\pgfkeysvalueof{/tikz/offset angle}%
+\pgfkeysvalueof{/tikz/mmap/sign}*\pgfkeysvalueof{/tikz/sibling angle}*\tikzcountchildiii}%
\global\advance\tikzcountchildiii by1\relax%
\or
\pgfmathsetmacro{\pgfutil@tempb}{\pgfkeysvalueof{/tikz/mmap/overall rotation}%
+\pgfkeysvalueof{/tikz/mmap/sign}*\pgfkeysvalueof{/tikz/offset angle}%
+\pgfkeysvalueof{/tikz/mmap/sign}*\pgfkeysvalueof{/tikz/sibling angle}*\tikzcountchildiv}%
\global\advance\tikzcountchildiv by1\relax%
\or
\pgfmathsetmacro{\pgfutil@tempb}{\pgfkeysvalueof{/tikz/mmap/overall rotation}%
+\pgfkeysvalueof{/tikz/mmap/sign}*\pgfkeysvalueof{/tikz/offset angle}%
+\pgfkeysvalueof{/tikz/mmap/sign}*\pgfkeysvalueof{/tikz/sibling angle}*\tikzcountchildv}%
\global\advance\tikzcountchildv by1\relax%
\fi
\mmap@debug@message{level=\the\tikztreelevel,%
\the\tikzcountchildi,\the\tikzcountchildii,\the\tikzcountchildiii,
rotation=\pgfutil@tempb,sibling angle=\pgfkeysvalueof{/tikz/sibling angle}}%
\pgftransformrotate{\pgfutil@tempb}%
\pgftransformxshift{\the\tikzleveldistance}%
}
\makeatother
\tikzset{%
mmap/.cd,
name/.initial=undef,
overall rotation/.initial = 0,
overall xshift/.initial = 0pt,
overall yshift/.initial = 0pt,
sign/.initial = 1,
child weight/.initial = 0.5,
rotation/.initial = 0.5,
shape angle/.initial = 180,
distance to 1/.initial = 4.5cm,
distance to 2/.initial = 7.5cm,
distance to 3/.initial = 10cm,
distance to 4/.initial = 12cm,
distance to 5/.initial = 14cm,
offset level 3/.initial = 0,
/tikz/.cd,
offset angle/.initial=0,
Xshift/.style={xshift=#1,mmap/overall xshift=#1},
Yshift/.style={yshift=#1,mmap/overall yshift=#1},
% branch color/.style={
% concept color=#1!80,
% ball color=#1!50,
% every child/.append style={concept color=#1!50},
% },
}
%----------------------------------------------
% Style of the mindmap
%----------------------------------------------
\tikzset{mymmstyle/.style 2 args={
text width=1.5cm,
align=flush center,
mindmap,
Julien growth,
mmap/overall rotation=\pgfkeysvalueof{/tikz/mmap/rotation},
mmap/sign = 1,
mmap/name = semicirc, %<- you need unique names if you want to use several mindmaps
every node/.style={
concept,
circular drop shadow,
execute at begin node=\hskip0pt,
text=#2,
},
node font=\sffamily,
nodes={concept},
concept color=#1,
root concept/.append style={
ball color=#1,
line width=1.5ex,
text=#2,
font=\LARGE\bfseries\scshape,
minimum size=3.25cm,
text width=3.25cm
},
level 1/.style={%
level distance=\pgfkeysvalueof{/tikz/mmap/distance to 1},%
font=\large,%
minimum size=2.5cm,%
text width=2.0cm,
fill= #1!70,
sibling angle/.evaluated={\pgfkeysvalueof{/tikz/mmap/shape angle}/max((MMapNodesAtLevel(1)-1),1)}
},
level 2/.style={%
level distance=\pgfkeysvalueof{/tikz/mmap/distance to 2},%
font=\normalsize,%
minimum size=1.5cm,%
text width=1.5cm,
fill= #1!50,
sibling angle/.evaluated={\pgfkeysvalueof{/tikz/mmap/shape angle}/max((MMapNodesAtLevel(2)-1),1)}
},
level 3/.style={%
level distance=\pgfkeysvalueof{/tikz/mmap/distance to 3},
font=\normalsize,
minimum size=1.5cm,
text width=1.5cm,
fill= #1!30,
sibling angle/.evaluated={\pgfkeysvalueof{/tikz/mmap/shape angle}/max((MMapNodesAtLevel(3)-1),1)},
offset angle=\pgfkeysvalueof{/tikz/mmap/offset level 3}
},
level 4/.style={%
level distance=\pgfkeysvalueof{/tikz/mmap/distance to 4},
font=\normalsize,
minimum size=1cm,
text width=1cm,
fill= #1!30,
sibling angle/.evaluated={\pgfkeysvalueof{/tikz/mmap/shape angle}/max((MMapNodesAtLevel(4)-1),1)},
offset angle=\pgfkeysvalueof{/tikz/mmap/offset level 4}
},
}
}
%\newcommand{\MyMindMap}[2][mymmstyle={blue}{white}]{
%\begin{tikzpicture}[#1]
%% \begin{scope}[#1]
%% \input{#2}
%{#2}
%% \end{scope}
%\end{tikzpicture}
}
\begin{document}
\begin{frame}
\frametitle{Audience catching mindmap}
\resizebox{\linewidth}{!}{
\begin{tikzpicture}
\begin{scope}[mymmstyle={orange}{orange!50!black}]
\node[root concept] {Root}
child {node {level 1}
child {node {level 2}
child {node {level 3}}
child {node {level 3}}
child {node {level 3}}
}
child {node {level 2}
child {node {level 3}}
child {node {level 3}}
}
child {node {level 2}
child {node {level 3}}
child {node {level 3}}
child {node {level 3}}
}
}
child {node {level 1}
child {node {level 2}}
child {node {level 2}
child {node {level 3}}
child {node {level 3}}
}
child {node {level 2}
child {node {level 3}}
child {node {level 3}}
}
}
child {node {level 1}
child {node {level 2}
child {node {level 3}}
child {node {level 3}}
}
child {node {level 2}
child {node {level 3}}
child {node {level 3}}
}
child {node {level 2}
child {node {level 3}}
child {node {level 3}}
}
}
;
\end{scope}
\end{tikzpicture}
}
\end{frame}
\begin{frame}[allowframebreaks]
\frametitle{Audience killer list}
\begin{itemize}
\item level 1
\begin{itemize}
\item level 2
\begin{itemize}
\item level 3
\item level 3
\item level 3
\end{itemize}
\item level 2
\begin{itemize}
\item level 3
\item level 3
\end{itemize}
\item level 2
\begin{itemize}
\item level 3
\item level 3
\item level 3
\end{itemize}
\end{itemize}
\item level 1
\begin{itemize}
\item level 2
\item level 2
\begin{itemize}
\item level 3
\item level 3
\end{itemize}
\item level 2
\begin{itemize}
\item level 3
\item level 3
\end{itemize}
\end{itemize}
\item level 1
\begin{itemize}
\item level 2
\begin{itemize}
\item level 3
\item level 3
\end{itemize}
\item level 2
\begin{itemize}
\item level 3
\item level 3
\end{itemize}
\item level 2
\begin{itemize}
\item level 3
\item level 3
\end{itemize}
\end{itemize}
\end{itemize}
\end{frame}
\end{document}
```